In celebration of post number 100 on Nordiska Knivar I would like to present a special piece that has been in the planning stages for sometime.
I have presented the knives of Roman Kislitsyn on these pages before (Roman Kislitsyn) and I was in awe of his work. I asked him where he learned how to make Sami style knives with such beautiful and intricate carving. He told me he was self taught and some of what he learned was from Nordiska Knivar.
I asked him if he would consider doing a work in progress post to show a work in its various stages and he graciously agreed. I hope you will enjoy this post as much as I do.
Thank you very much to Roman for taking the time to do this for Nordiska Knivar!
Please visit his blog at Roman’s blog (girvas.blogspot.ca)
Sami style carving my way by Roman Kislitsyn
First of all, a disclaimer: This is how I do carving. I learned it all myself using information from the internet and by no means it is the only way or even this is right way to do Sami style carving. But this works for me.
The hardest question to answer about carving is “How do you come with the patterns, where can I learn it?” This question has no answer. Or, more precisely, every maker has his own answer.
I grew up in the Kola region, north-west Russia. This land used to belong to Sami people for hundreds and thousands of years. Very few Sami people were living there by the time my family moved up north, but most of the topographic names came from Sami language and they always sounded like a mystery to me. I never had Sami friends, but grew up with the music of the names of mountains, rivers, and lakes: Kukisvumchorr, Aikuaivenchorr, Tuliyok, Kaskasnewyok, Chudzyavr, Pyatnyavr…I was fascinated by these long words and their secret meaning. I like to believe that this helps me to see the beauty of Sami carving patterns and helps me to create my own combinations of traditional design elements. I also get inspiration from seeing other Sami crafts, jewelry, tools, and, of course, Sami knives.
I try not to copy other people’s work, but rather learn new elements and patterns, try to draw them in different combinations and see what works and what doesn’t.
I like to go out and sit on the lake shore or on the top of the hill and look at the Nova Scotia landscape which reminds me of places where I grew up, and this also helps to come into right mood and I often come up with ideas this way.
In my work I mainly use traditional materials like reindeer antler and all sorts of figured birch, but I like to experiment with other woods as well. If you ask me what is my favorite wood, it’s probably a birch burl. I used this wood for my very first knife and I was fascinated by the deep three dimensional structure of this wood. And even now, a quarter century later I still find it very attractive.
As to the reindeer antler, many people believe that it is best if it’s white or almost white, like ivory. I think that plain white is rare, but boring. Antler has many subtle tones and colors which are beautiful and which create a unique pattern on each piece…but let’s get to business.
This tutorial is about Sami style carving on reindeer antler, not the whole knife making process, so the first few photos briefly demonstrate building of the knife, then I show my carving tools, and then explain process of carving.
Everything begins with selection of blade and materials. By this time I usually have an idea of what this knife will look like. Often I draw a sketch, but over time I figured that the pattern from original sketch rarely looks good on the real knife. So I just roughly draw an idea and then, when the knife is ready for carving I draw on it and see what pattern looks good. Anyway, here are a few photos of how knife is made.


On the last photo both handle and sheath are sanded down to 2000 grit and buffed with velvet wheel on my Dremel. This makes the antler surface very smooth and even tiny defects become clearly visible. If small scratches are not completely removed they can pop up after paint is applied and then it’s too late to get rid of them. Also wooden parts are stained and covered with two or three layers of teak oil. Now I’m ready to draw the pattern. After few experiments I come with the pattern I like.
I take a photo at this stage and in a future I use this photo as a reference because pencil lines get erased easily from the smooth surface of antler as I start carving.

Now it’s time to say “damn! I forgot the rivets!” Believe it or not but by this time I get so excited to start carving, that I forget about rivets in about 50% cases. Ok, rivets are installed and filed flush with the surface, everything is sanded down to 2000 grit again and NOW I can finally start with carving. Since it will be two colored pattern, I first draw and carve main lanes for the black part.

Here is my carving knife. This is my main tool which I use for pretty much everything except for round dots. To make dots I use an awl. I made this knife from a flat lathe blade using my Dremel tool. I think it’s called parting blade, but I’m not sure.


The carving knife needs to be very sharp and I hone it before each session with 1000 grit wet stone and green polishing compound. I also hone it with green compound after each 10-15 minutes of work or if I feel I need to.

Carving technique is very simple. Everyone who carved his or his girlfriend’s name on a tree or on the neighbor’s fence knows how to do it. Basically I hold a knife like a pencil and drive it with one hand, while pushing it with a thumb of the other hand and holding the work with all free fingers. This way I carve along a line…

…and then carve it back along same line removing tiny amount of material and forming a V-shaped groove. This way I carve all the lines. To make thicker lines I hold a knife at lower angle to the antler surface. To make thinner lines I keep a knife more vertical. It is very important not to push too deep. Grooves need to just a fraction of millimeter deep.

To make little triangles I use a different technique. Line forms a base of triangle, then I take my carving knife like an awl and with one push I make a cut from the bottom of triangle to the top. This is a deep cut with a corner of the knife. Then I turn backwards and make same deep cut from the top down to the base. If everything is done right, I get a nice triangular hole.


After the carving is done I carefully check it and clean all corners. Then I lightly sand everything with 800 grit paper. If I’m doing one color, I would sand it to 2000 grit again. But this time I’m doing 2 colors and will have to sand it again after the second session of carving. So, I will sand it to 2000 later.

Then I thoroughly paint everything with artistic oil paint.

And thoroughly wipe it off.

Do same with the knife handle.


After paint is dry I thoroughly (you probably noticed by now that all the paint stuff need to be done thoroughly) rub all black lines with the candle to cover them with paraffin. ThenI wipe paraffin from open areas, draw and carve brown lines.


For some reason artistic oil paint does not come in brown color. Instead it comes in a bunch of colors like Van Dyke brown (which is rather black to my eyes), or burnt sienna(which I think is rather dark roast color). So, I figured that to get a brown color I like, I mix 1:1 Van Dyke brown and burnt sienna, and then add a bit of white until the resulting color is light enough. Then (yes, that’s right!) I thoroughly paint all brown lines and clean excess of paint. Ta-da!!!


After brown paint is dry it’s time to remove protective layer of paraffin from black lines. I carefully warm it up on the stove until paraffin starts melting and thoroughly wipe it off with clean soft rag.
All I have to do now is to stitch and dye the leather top for the sheath.
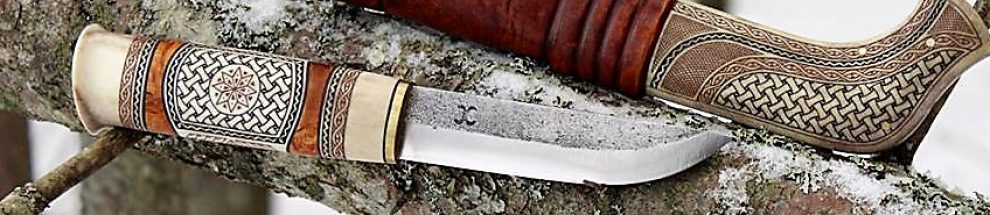
And here is a final result:


