Monthly Archives: May 2017

Yakut

By Federico Buldrini

The Sakha Republic or Yakutia is a 3 million square kilometers territory located in Oriental Siberia, within the Russian Federation. It’s characterized by extremely cold winters and is covered for the most part by coniferous forests, favouring hunting and fur animals breeding.

The soil is extremely rich in reserves of oil, gas, coal, gold, silver, tin and diamonds. In Sakha live mainly Russians, Ukrainian and Yakuts, the indigenous people. Yakuts have a northern Asian body type and can be roughly divided in two groups. The northern one is composed mostly by half nomad reindeer herders, hunters and fishers, much like the Sámi, while the southern one live mainly from horses and cattle breeding.

Sakha also called Yakut, one of the major peoples of eastern Siberia, numbered some 380,000 in the late 20th century. In the 17th century they inhabited a limited area on the middle Lena River, but in modern times they expanded throughout Sakha Republic (Yakutia) in far northeastern Russia. They speak a Turkic language.

Soviet-Dvisions-Map

The Yakut knife is the Siberian counterpart to the Finnish puukko, the Swedish brukskniv and the Norwegian tollekniv. Though, unlike its Fennoscandic cousins, it’s highly specialized in the processing and preparation of fish and meat, rather than being also a wood working knife.

Its origin is unknown, various legends and theories exist, though mostly speculative since the majority of the old knowledge and tradition of this knife was lost during the communist regime: the Yakuts themselves started to study it only in the 1990s.
One unlikely theory suggests, for example, that its asymmetrical blade is a steel version of the prehistoric bone knives: if a long bone is splitted the outer side will be convex, while the inner side will be hollow, once the marrow has been removed.
On the other hand a common legend says that the blacksmiths learned the art of forging this knife from the Hell’s gods themselves.

Adams 2

A yakut by Johannes Adams.

adams 3Adams

Another disputable theory states that the blade’s particular geometry was developed not only for its performance, but also to use less steel for each blade.
While possible to save a little steel by forging the fuller, is unlikely that was the primary reason and it’s much more probable the geometry was essencially purpose driven.

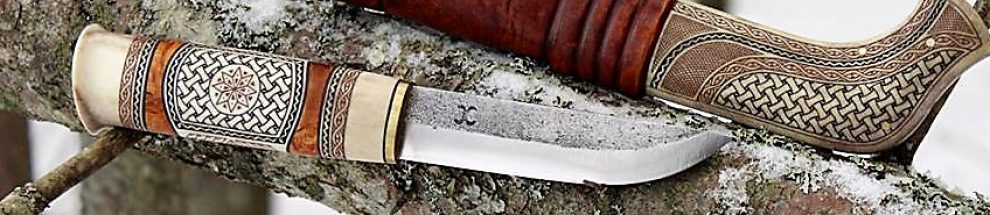
On the practical side, a yakut knife is essentially a three piece knife: a monolitic wood handle, an asymmetrical blade and a leather sheath.
The handle is generally crafted from birch burl, is untapered and has a flattish oval section.

The asymmetrical blade usually has a left convex bevel and a right flat one, sporting a more or less deep fuller in it.
The knives coming from the northern area of Yakutia tend to have a more tapered blade, as opposed to the southern ones sporting a slightly broad blade.
The side stitched sheath is traditionally made from cow tail hide, has a wooden liner and grips the knife halfway up the handle.

Roman

A yakut by Roman Kislitsyn.

Roman 2

As said, the Yakut knife is optimized for slicing push cuts and can be commonly seen cutting curly flesh stripes from frozen stiff Coregons to prepare the Stroganina, a Yakutian dish. The flesh is served raw, still frozen, with a touch of salt and black pepper in ice cold bowls and eaten with the hands. Everything is usually paired with vodka.
Stroganina can also be done with sturgeon, reindeer meat or frozen fresh mare’s milk.

Here is where the fuller comes into the game. In addition to lighten the blade and give the knife a handle heavy balance, it also dramatically reduces the surface of outer contact, making slicing easier.

The Yakut knife is thus a good wood planer with push and pull cuts, the latter with the flat bevel in plain contact with the cut surface. Though, unless you tilt the blade at an angle, the wood shaves will be fairly flat.

On the other hand, the asymmetrical grind is not that great when doing pull cuts without the flat side being in contact with the wood or when cutting off shaves engaging the wood perpendicularly, because it has very little material behind the edge and not enough mass to separate fibers by geometry alone.

Meanwhile In Ulvila…

Ilkka Seikku and Jani Ryynänen are hard at work. Everybody’s crazy about a sharp dressed puukkoseppä!

Jani

Ilkka

Take a look at their work here:

https://nordiskaknivar.wordpress.com/2013/05/25/making-a-puukko-without-power-tools-by-ilkka-seikku/

https://nordiskaknivar.wordpress.com/2013/03/23/jani-ryynanen/


Joonas Kallioniemi WIP

Five years ago today I began Nordiska Knivar with a post featuring a puukko by Joonas Kallioniemi. It was a gleaming black ebonite puukko with dovetail joints, a beautiful perfect knife. Now five years and 113 posts later I’d like to thank everyone who has made this blog possible, all the puukkoseppä who have been so generous with their time. There could not be a blog without you. Thank you to Bill Lecuyer for the gift of the Aito that opened my eyes to the perfect and elegant form of the puukko and a special thanks to Federico Buldrini whose scholarship and hard work have raised this blog to a higher level.

To all the puukkoseppä, there is a tremendous interest in your work. At this moment there have been  223,282 visitors and 730,035 views of your work from 180 countries and territories of the world. Thank you again for your willingness to contribute and answer my questions and requests.

I thought it would be fitting to feature my friend Joonas on this fifth anniversary post. As usual he has provided a beautiful puukko and WIP for me. Thank you Joonas!

Joonas Kallioniemi:

“Some time ago Mike mentioned that this blog would soon reach the respectable age of five years. His first blog post featured a black ebonite handled puukko of mine, so it seemed only fitting that I could give my respects to the blog by showing the building process of a recent puukko.

Here’s what I start out with: some k460 steel (O1 equivalent) round stock for the blade, some stainless flat stock for the bolsters and a block of ivory paper micarta for the handle. I had a vision of this puukko some time ago and Mike’s idea of the blog post was the final step. This knife had to be brought to life! At this point I have a clear image of the finished puukko in my head.

1

This is where the making always starts. You can see me heating the steel to forge the blade to shape.

2

Here is the roughly forged blade next to the raw material. I get the basic shape of the blade ready. It is vital to get the shapes right but at the same time I must not spend too much time being overly precise.

3

I just quickly descale the blade to help the grinding process.

4

I also give some touch ups for the profile before grinding the bevels.

5

Here you can see me grinding the blade. With properly forged bevels the grinding process becomes easier.

6

Blade is rough ground with the shoulders filed in. I’m ready to heat treat the blade.

7

I sometimes bounce from one task to another to get a fresh look at things. I do some roughing of the stainless fittings on the mill.

8

After the milling and heat-treating this is where we are.

9 (1)

I finish the blade grit by grit. I try to avoid polishing my blades, as has been the case for some years now. I am more satisfied with a slightly more matte, clean finish, and that works very well with this project as well. I don’t want this knife to be shiny. I also do some testing of the blade before finishing to make sure I have a sound blade.

10

The fitting of the front bolster to the blade. Patience is the key here. What I lack in skill I can compensate with patience. A good fit here is one of those things that separates a well made puukko from cheapo knives. Stainless steel is one of the materials that I have tried to avoid as it is not an easy material to fit, but now it was just what I wanted.

11

Fitting is done! I also add my name to the blade. Now it is visible who is responsible.

12

Now I can sit down and have a think about the handle. Paper micarta is something new to me.

13 (1)

After various steps of cutting off excess material and drilling some guide holes I can start fitting the blade to the block. I use various hand tools to get a good fit.

14

I try to get a combination of a good fit but with some room left for epoxy. A good puukko would stay together with just a well peened tang and good fit, but epoxy is a nice addition to the structure.

15

The roughly made upper bolster needs some handwork at this point.

16

Notice one detail that you rarely get to see as it is not apparent on a finished puukko. Once the bolsters have been roughly brought to shape I groove out the back end. This makes a small grippy pocket for epoxy and also with less surface area it is easier to get a very good fit to the handle block. This is one of those small details that I like.

17

I guess I’m ready to start putting things together.

18

The parts have been put together. I peen the tang to get a tight fitting package, with epoxy in between to get added structural strength. This is the point when those various pieces suddenly form a knife. I know, not a very comfortable knife. But still, a knife.

19

The peened end of the tang is visible here. It will get much cleaner as I finish the handle. But not bad at this point.

20

When I start shaping the handle I always first shape the side profile and then the upper profile.

21

Then when I feel that the dimensions look good I take out the corners.

22

And after that I take out more of the corners. It is important to be systematic here to keep the shape in constant control. If I lose my touch of the shape I have a really hard time getting it back to my reach.

23

With proper planning and systematic work it is then easy to start rounding everything up, and before you know it you end up with the shape ready!

24

After shaping it is a matter of having the patience to go trough the steps of refining the surface finish. Here you can see I’m getting close.

25

Once the puukko itself is more or less finished I can start working on the liner that goes inside the sheath.

26

I use plywood as it is easy to work with and it is strong and stable.

27

Next step is to cut the leather for the sheath. Leather work is something totally different when compared to making the blade or the handle. It is refreshing to get to work with so many different materials.

28

Now I have the leather thoroughly wet and stitched around the sheath. I have also cut the belt hanger. From this point on I need to let the leather dry, but while I do that I must give care and attention to the sheath from time to time…

29

…so that as it dries out the shape and surface finish comes out just right.

30

With the leather all dried up I give it some leather grease and wax polish. I also make the rivet and ring for the hanger. When I make a puukko I get blinded by my work. I don’t really see the puukko itself as I focus on the craft. But at this point it is starting to be clear to me that the knife is almost ready. I can only smile when I realize that as I put the final pieces together the puukko is ready! This will be a refined, classy looking puukko.”

31

1mh (1)2mh3mh4mh5mh6mh

Joonas

Ryynänen and Jaakonaho Puukkos Review


By Federico Buldrini

These two puukkos were crafted by Jani Ryynänen, residing in Kullaa and Pasi Jaakonaho, residing in Inari.
Ryynänen is a hobbyist maker, part of the newer generation of rising knifemakers whose work is current as well as utilitarian in style.
Jaakonaho is one of seven Finnish puukkoseppämestari or master bladesmiths. Being a teacher of Sámi crafts and devoting much time to the construction of silver jewelry and wooden artifacts, knife making is mostly a hobby for him as well.
Both handles are fixed by tang peening and oven heating.

(Both puukkoseppäs have been profiled on this blog, see the Index Page.)

Jani Ryynänen

blade
length 95 mm
width 22 mm
thickness 3 mm thick at the spine; 5 mm at the bevels
tang 7×4 mm
steel Krupp 80CrV2
bevels flat
edge angle 20 °, with small micro bevel
hardness ~ 60 HRC at the edge

handle
length 110 mm
width 29 mm max.
thickness 21 mm max.

weight
knife 115 g
with sheath 152 g

DSC02378

DSC02372DSC02373DSC02376DSC02377

Overview

The blade was forged with hand held hammer from a bar of 80CrV2. It has a rhombic section, slightly tapered in height. After annealing and normalization it was heated in the forge, quenched in oil and tempered in an electric oven. During the quenching the tang and the spine were kept off the oil so to make them softer than the edge. The bevels are brought to 20 °, polished by hand and the edge has a small micro bevel.

The handle is made of birch bark flaps compressed between two 5 mm brass plates. It’s sanded to a fine grit, it’s slightly tapered in height on both sides. The thickness, however, diminishes clearly from the center towards the blade. The section is almost oval in the first 2 cm near to the pommel and then gradually becomes a teardrop.

The 3 mm thick leather sheath, is hand sewn and holds the knife tightly. Inside there is a birch liner. The belt loop is fixed with a brass ring which, compared to the triangular ones, slightly loses in stability of the sheath during the carrying, but without becoming boring. The loop itself it’s closed by a brass rivet.

Pasi Jaakonaho

blade
length 97 mm
width 20 mm
thickness 4 mm at the spine; 5.5 mm at the bevels
tang 5×3 mm
steel Böhler K510
bevels flat
edge 20 °
hardness ~ 60 HRC

handle
length 104 mm
width 25 mm max.
thickness 18 mm max.

weight
knife 100 g
with sheath 140 g

DSC02544

DSC02540DSC02541DSC02542DSC02543

Overview

The blade was forged with hand held hammer from a bar of Böhler K510. It has rhombic section, slightly tapered in height. After annealing and normalization it was quenched in oil and tempered in an electric oven. During the quenching only the tang has been kept out from the oil, the blade is thus uniformly hardened on its entire height. The bevels are ground to 20 ° and polished by hand.

The handle is made of birch bark flaps compressed between two brass plates, 3.5 mm the collar and 5 mm the pommel. It’s sanded to a fine grit and has a hint of taper in width and thickness, in both directions. It has an acute teardrop section and its proportions are pretty slender and thin.

The half-tanned 1.5 mm thick leather sheath is hand sewn and holds tightly the knife. Inside there is a birch liner. The belt loop is fixed with a brass D ring so the knife is still very free to swing on a belt, a bit less than with a round ring, but still more than with a triangular ring. The loop itself is closed by a leather string.

In use

Out of the box the Ryynänen puukko was sharp, but not perfectly shaving sharp. I then touched it up with DMT 1200/8000 and stropped with Bark River black and green compound. In ten minutes it was hair popping sharp.
The handle, in spite of being stocky, responds well and I didn’t felt it “stiff” due to the greatly executed gradual section transition.

DSC02673

The first thing that struck me in the Jaakonaho was the handle, much shorter, thinner and with a much stronger section compared to what I am used to. After an hour of carving on elderberry, just to get familiar with it I found some microchips near the front bolster and on the edge belly. They were reduced with a couple of minutes of stropping with green compound, thus adding also a hair of micro bevel.

DSC02671
During the carving of the elderberry spikkentroll, the Ryynänen showed good bite and penetration. However, because of the blade wide proportions, I felt like if it was slightly suffering during the pull cuts during the first phase of finishing. Comfortable handle, nothing to report. At the end of the work the blade had a few rolls in the central part of the edge and shaved with some effort.

During the spikkentroll carving the Jaakonaho has been very aggressive and at times the penetration was such as to get the blade slightly stuck. During the roughing cuts I felt the handle a tad small. At the end of the work the blade had lost some bite, still shaved but with some effort.

During the carving of the silver fir spatula, on the other hand, the Ryynänen proved itself more agile than what I expected and a very balanced performer, with good bite, good nimbleness and accuracy both during roughing and finishing. I perceived no bite loss during use, it always was easy to achieve tiny tight curls and the knife has always left a glossy finish on the wood. At the end of the work I detected three microrolls at the center of the edge and only its curved section was still shaving. The flat section didn’t shave anymore, but was still biting.

During the carving of the spatula, the small measures of Jaakonaho’s handle were much more perceivable, but without being insufficient, conveying the feeling of a minute but very lively knife. The blade, on the other hand, got often stuck during roughing cuts due to its own thickness and bite, making the work more strenuous. During the finishing cuts, though, it showed all its potential allowing great working speed, creating extremely fine curls and leaving a high gloss finish on the wood. I perceived no bite loss. After the work I found some rolls along the edge, which still shaves but with some effort.

DSC02600DSC02599DSC02598DSC02596

Conclusions

Let’s sum it up.
The Ryynänen, showed very homogeneous performance, being more comfortable on medium sized jobs. Its proportions and dimensions are a bit over sized for very small projects, but given the agility demonstrated it’s easy to get used to. Its very size makes it probably more appreciable by those with large hands.
The steel tends to roll rather than chip. 80CrV2 at 60 HRC doesn’t have an exceptionally long edge holding, but still plenty enough, gaining in resilience and ease of sharpening.

The Jaakonaho has instead proved to prefer smaller jobs. Not surprisingly its proportions makes it preferable to those with small hands. The handle, although thinner and shorter than what I’m used to, was never uncomfortable, but its small size were absolutely perceptible.
The blade, combining great thickness with a very acute edge often acts like a wedge, thus tending to get stuck. A thickness closer to or slightly less than 5 mm would have been probably better. The steel tends to microchip more often than rolling, has a bit superior edge holding compared to 80CrV2, and still resharpen easily.