Monthly Archives: September 2012

Tommi Puukko

Kalle Keränen and the Tommi Puukko

Adapted from an article by Taisto Kuortti
Translated by Federico Buldrini and  Pasi Hurttila

Finland, 1870. Close to Hyrynsalmi, in the region of Kainuu, South Karelia, lived Kalle Keränen (1844-1912) a young self-taught blacksmith who had heard that a metallurgist from England  was arriving at Fiskars to teach the rudiments of forging and oil quenching. At that time Finland was going through a period of bad famine, so Kalle decided to go south, learn new things and look for better luck. He packed his ruckpack and set off on foot. He was about to march for 730 km.

It was probably Edward Hill, another metallurgist and teacher at Fiskars, that brought oil quenching concept to Finland. Kalle became the pupil of Thomas Woodward, with which he further perfected his forging technique and experienced oil quenching. Three years in the noisy south were more than enough for Kalle, so he soon decided to return to his forests and to his smithy.

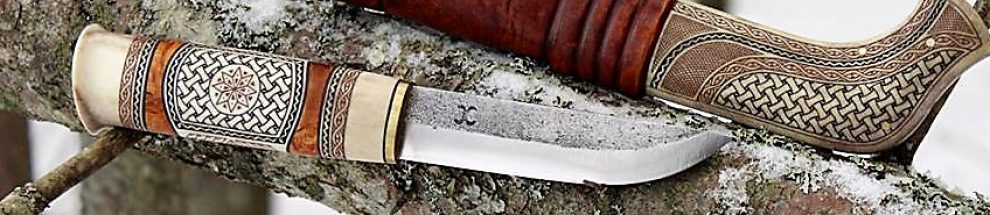
Kalle began to forge knives regularly after his return from Fiskars and gave his own interpretation of the Kainuu regional style. It was a simple puukko with 11 cm barrel handle and 10 cm rhombic blade with slightly hooked tip. However, the latter peculiarity was later abandoned in favor of a completely straight spine. Kalle named the knife in honor of his master, from Thomas, Tommi.

His knives were good tools and earned great success thanks to the excellent quality of the blade. They became famous even outside its province and other smiths began to forge following his style. It is however uncertain when the knife acquired completely its technical and aesthetic features, now widely recognized. Kalle’s knives became even more famous and customers started to call him Tommi. With the passage of time the blacksmith became simply Tommi, he was a good knife maker and a good drinking mate

After his death, his son Setti continued the father’s work and introduced the larger models that would have had an important part during the Winter War and the struggle for Finnish independence  from Russian domination. The larger Tommis would have been used as short swords in close combat fights and as leave gift for graduates.

The Tommi is the only Finnish puukko to have developed a such defined own tradition and to be so famous beyond the borders of Finland. The eighth Finnish president, Urho Kekkonen, a eager hunter, used to keep one in a drawer of his desk and in various occasions used these knives as a gift for political collegues.

Today the tradition is kept alive by other makers as such as Mauri Heikkinen mauriheikkinen.fi/ Jukka Hankala http://www.hankala.com/ and Pentti Kaartinen http://www.tommipuukko.com/index.htm.   Veijo Käpylä at Kainuun Puukko http://www.kainuunpuukko.com/

As it says on Jukka Hankala’s website “Tommi is an old knife model, which has been made by at least 150 different bladesmiths in Finland. Every bladesmith gives his personal shape and form for the knife he makes. Tommi is very simplified general purpose knife.”

Thank you to Federico Buldrini for this article.

Mauri Heikkinen

Jukka Hankala

Pentti Kaartinen

Kainuun Tommi

Kainuun tuplatommi or double puukko

Setti Keränen

Monument to Kalle Keränen


Maasepän Puukko

Here is some information about a very basic form of puukko, a style of knife making that has been around through the ages. I would like to thank Federico Buldrini who originally posted in this piece in a somewhat different form and Ilkka Seikku the puukkoseppä who did the tutorial and wrote additional text. Ilkka’s excellent work can be viewed at his website  http://rautasarvi.fi/?cat=34

Also visit his blog at: http://rautasarvi.blogspot.fi/2013/11/blog-post.html

I hope to be featuring more work by Federico and Ilkka in the near future.

Federico Buldrini:

“The maasepän puukko (something like saying “old villagers blacksmith knife”) is the simplest and oldest style of puukko and has parallel equivalents in Sweden and Norway too. They have their origin in the early Middle Age as all around belt knives of the free men. In higher classes knives were obviously more refined (metal bolsters, pattern welded blade, metal decoration/retentions on the sheath) but we are now talking of the original humble man knife.

The following pictures are of a knife and sheath being made by Ilkka Seikku. The process in this case, trying to be the closest possible to how it was made in the old days. Ilkka  produces his own pine tar in the old way, by heating old wood in a cauldron (the method is shown also in Ray Mears “Sweden” episode).The pine tar seals  the wood  closing any gap. It was also used to protect longships hulls for a reason. Ilkka Seikku is a blacksmith, craftsman and wilderness guide, quite renown in Finland as a bow maker too. He’s very keen in keeping alive the old skills of the fathers, despite his young age.”

Ilkka Seikku:

“I want to explain one very relevant thing about maasepänpuukko. It is the rhombic blade shape. Usually people think that rhombic blades are something that has been invented on purpose. The truth is that this rhombic shape has come from the material these “countryside blacksmiths” were sometimes using. They did use old files to make blades, and this is very common nowadays too! One type of file was particularly found to be very functional to make blades from, it́s the so called feather file. It́s already in shape of rhombic and that was easy to forge or even just grind in blade shape. It́s very plausible that this rhombic shape was just a secondary matter. Then people who used those rhombic shaped blades found the shape very functional. The last two pictures of maasepänpuukko are ones I have forged from a feather file. You can see there are still file teeth.

The birch bark sheath is called “tuohituppi” in Finnish. “Tuohi” means birch bark and “tuppi” means sheath. The wooden insert inside is called “lesta”. Birch bark does not need any kind of treatment. Inside of birch bark there is  oil, which makes it water proof. Birch bark is very long lasting material. You can see that from the archaeological puukkos, for example. Very often there is almost nothing left from the blade, but if there has been birch bark handle or sheath, that is still recognizable. Also birch bark has been very common material to keep moisture out from log houses in Finland. Between the stone (which is in the ground) and the log, birch bark works excellent. Moisture from the ground goes up via stone, but birch bark stops that and moisture will never ends up to the wood.”

Let’s start with the block of wood and the blade, the tang has a sharp point. The wood is roughly carved with an axe.

Then a hole is drilled in the wood and enlarged with a hot iron rod.

The blade is stuck in the wood is then struck on a large log to “nail” the tang well into the wood. If the operation is done properly the blade will stay in place without any glue or wedges against the tang.

The handle is then carved and sanded with #120 paper.

Finally the handle is treated with pine tar.

The sheath could be the usual back sewn leather tuppi or one woven from birch bark.

Image

Image

Image

Image

Here are some very nice additional examples of the maasepän puukko sent to me by K. Kock. Please visit his website and blog at http://www.promaakari.fi/ and http://promaakari.wordpress.com/

OLYMPUS DIGITAL CAMERA

OLYMPUS DIGITAL CAMERA

OLYMPUS DIGITAL CAMERA

"This one with a "dagger blade" I have gotten from my father (you can maybe see his initials LK in the pommel end of the handle). It´s blade is steel witch has been made from limonite iron ore dug up from thelakes bottom i.e. so called "järvimalmi". This puukko was made in 1950´s for my father by an old smith in Middle Finland. K.Koch"

“This one with a “dagger blade” I have gotten from my father (you can maybe see his initials LK in the pommel end of the handle). It´s blade is steel which has been made from limonite iron ore dug up from the lake bottom i.e. so called “järvimalmi”. This puukko was made in 1950´s for my father by an old smith in Middle Finland. K.Kock”

OLYMPUS DIGITAL CAMERA

OLYMPUS DIGITAL CAMERA

Here is a special maasepän puukko featuring Ilkka’s family insignia which he explains on his blog:

3 Ilkka


Tuppi: Work In Progress by Saku Honkilahti

I am happy to post this work in progress pictorial by Saku Honkilahti. The tuppi, or sheath of the puukko is unique, distinctive and very pleasing to the eye but sometimes taken for granted as just storage for the knife. The Finnish tuppi is a work of art in its own right. I didn’t realize the amount of work and skill required to create a tuppi. They are created as part of the puukko and the fit is very important. Sometimes you will hear a slight clicking sound as the puukko seats in the tuppi. This is a good thing and means the knife is secure and the tuppi is a proper fit.

Saku has been very helpful to me in my search for information on the puukko. He is a talented puukkoseppä whose work I am happy to recommend. If you would like to see more of his work please visit his site at http://www.netikka.net/sakunsivu/

Thank you Saku!

Sheath Making My Way…

Image

First we take a nice piece of birch

Image

then we draw the blade to the wood

Image

and carve til the blade fits perfectly.

Image

Image

Then we saw away what won’t be part of the sheath.

Image

Image

Then I usually saw or sand little bit more, so it looks good to my eye.

Image

Image

Then comes lid. It is a very important detail so that sheath is sturdy enough.

Image

Then a little more sawing and sanding and it looks like this.

Image

And then comes the leather, about 2mm thick vegetable tanned cow leather.  Usually I made it thinner, that it suits better around the puukko.

Image

Now it looks like this. The thick part is where puukkos handle will be, both ends are remarkably thinner.

Image

Image

Turned the mouth part double.

Image

Now the leather is soaking in pure water.

Image

Next the puukko is protected against moisture with plastic and some tape.

Image

The necessary tools to sew.

Image

Puukko placed to wet leather and sewing can finally start.

Image

First I marked stitch places with fork…

Image

then I punch them with an awl.

Image

It must be tight. There is a knot in every stitch.

Image

When sewing is done, I cut off excess. The leather is still moist.

Image

Bonding and pressing the seam.

Image

When the leather is dry, I take the puukko out of the sheath…

Image

then some seam finishing with the sander.

Image

The leather is dyed.

Image

Sewing the belt loop.

Image

And finally, after some leather wax and polishing, it looks ready to go!

Image

Image