The first post on this site featured a beautiful puukko by Joonas Kallioniemi with a gleaming black ebonite handle. I admired that knife so much I asked Joonas to make one for me as well as one with a traditional stacked birch bark handle. Joonas was kind enough to document his work for me in a series of photographs. Here are those photographs of the fabrication of the two stunning puukkos. I hope you will enjoy watching this talented young puukkoseppä at work. I think these are works of art; clean, elegant and executed to a very high standard of craftmanship. Perfect! Here is the story from Joonas himself:
“Some time ago I was approached by Mike. He asked me to make two puukko knives for him, and he also asked me to take pictures of the process of making the knives. I was intrigued by the idea and we soon decided that it would make a nice pictorial for his blog. The pictures are not plentiful as it was hard to get everything photographed in the rush of making the knives, but I hope the pictures show some of the idea behind making these knives, and the work that is involved. So, let’s make some puukkos!”

We start by forging the blades. I am somewhat a traditionalist so I use a charcoal forge for heating the blades.

And here I’m hammering the blade to shape. I wear a respirator here. Despite the good air exchange there is a lot of small particles flying in the air so I like to play it safe, no matter how silly it looks.

Forging the blade.

The forged blades have some resemblance to a knfe blade, but there’s still a lot of work to do.

The oxide layer is gone!

You can now see the roughly ground blades. I didn’t get any pictures of the grinding process, but I use the same grinder that you see in a future pic where I’m shaping a bolster.

Some filework is needed to match the shoulders of the blades. It’s good to have a little radius on them.

After quenching and tempering you can see what the blade has gone through. The edge quench is clearly visible and the tempering colours have also appeared.

After that we can do a rough finish on the blades…

…so we can do some testing on them. It would be best to make a temporary handle on these and carry them for daily chores for a while, but I can’t find the time for that on every single blade. So I do my best at testing them before I do my final finishing.

After the testing I can do my final finishing and add my name.

Now I have protected the blades with tape and I have the materials ready for the handles: some birch bark and some ebonite. Notice that I have pre-machined the bolster materials. It helps me fit the pieces when I have a slot on them.

The front-bolsters are fitted by slowly pushing them down the tang of the blade and taking material off where it needs to be taken off. This can be achieved by small files or a rotary tool. My solution is a bit unorthodox, but I like the control that I get by using a cone-shaped burr on my mill. Good light is essential in all precision tasks.

Slowly we get there.

Now I’m adding the dovetail groove on the bolster. Some degree of precision is required.

After the pieces are fitted I shape them on my belt grinder with a tool rest.

Here’s the same.

We’re done shaping. The dovetailed bolster still needs to be shaped. You can see that I have milled the sides of the round ebonite bar to make it more convenient. I have also started cutting the pieces of bark.

Piece by piece I fit the bark and tighten every now and then. We’re almost done!

After about a 100 pieces (give or take, I didn’t count!) we can add the upper bolster and peen the tang. When I stack the handle I make it slightly longer than it needs to be and heat it with a heat gun. It allows me to make the handle even tighter and it makes the pieces stick together by activating the birch tar.

A couple touches with the belt grinder to see how the peening went, so far everything’s ok.

The knife looks rather strange at this point. I always go overkill with the size of the bark pieces. Better safe than sorry.

We need to assemble the ebonite handled knife as well. Here it’s ready to be put together.

Just a peek at the dovetail joint. It is painstaking to get everything right, but so far we haven’t messed it. Knock on wood!

Along with the dovetailed bolster, the inlaid rivet at the back end of the handle is one of my things, almost some sort of a trademark. It also needs to be fitted precisely or it will look ugly.

Again quite a leap but here I’m peening the tang. With solid handles like this I add epoxy for added strength, but It is the tightly fitted, peened structure that holds everything together mostly.

I forgot to take a picture after hammering. Here it has already been cleaned a bit with a touch on the grinder.

Time to take the tape off and check that everything is going like it should.

We first shape the side profile…

Then the upper profile.

And after that I round everything and make the shape right.

And the same with the birch bark.

Both profiles.

And again we can round everything up.

Here I’m shaping the handle on a disc-sander.

After the rough shaping it is just a matter of taking the handles to a finer and finer finish. This is just a pic to show how nicely the ebonite can be finished. We’re not yet completely done, but we’re getting there.

This is the inlaid rivet.

Both of the handles are almost completely finished so it is time to make the wooden liners that come inside the sheaths. They dictate the shape of the sheath so I need to be precise. The sketching and all the lines may seem strange but they help me get where I want.

With all the shaping and carving done, we just need to glue on the other side and shape it accordingly.

With the liners and handles finished, I have taken some 2mm cow leather to make the sheaths. The edge has been beveled and I have some markings on the pieces.

The leather needs a good soaking in warm water.

This is pure handwork. I stitch the leather on the knives to get just the right shape. Her you can see that I have already started to stitch it. Notice that I have protected the knife thoroughly with plastic wrap and packing tape so the moisture doesn’t get to it. I do my leather working in my home, away from the dirty workshop, because with leather you need a clean working environment.

Just a few holes at a time…

The peaceful and clean leather work gives some balance to my work, I like it.

Everything seems to be ok!

After the leather has dried and I have glued the seam it is time to clean it up a bit. A puukko knife does this job well.

And after a lot of smoothing and making the belt hangers…

We have the sheaths almost ready.

Some black and dark brown dye for the sheaths. After this I add metal rings between the sheaths and the hangers and thoroughly grease the leather…

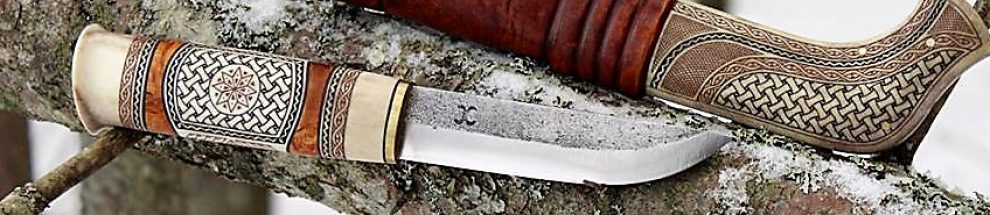
And we finally have two finished knives!


Outstanding work, Joonas. Thanks for the step-by-step. Both knives (and sheaths) are absolutely beautiful. I especially like the dovetail and your trademark inlay. Congratulations Mike. I know you’ll be very pleased.
Simply beautiful.
Great tutorial, Thanks.
very nice job
Absolutely incredible…. The ebony is stunning, and the leather work is amazing. Which reminds me… Mine should be done soon! Looking forward to it.